Kid-Friendly Veggie Pasta Salad

For my new job, I am building a lunch program for a progressive private school, with classes ranging from kindergarten to 8th grade. I’m trying to create a lunch menu filled with familiar items and foods the students will love, but doing my best to use minimally processed ingredients while remaining within our budget.

This recipe was taste tested by 19 children, and somehow only one of them picked out the tomatoes. I was shocked when I saw how many happily chowed down on their pasta salad samples and asked for more! I kept this recipe simple so the flavors are mild and the freshness shines.

We told the children to give a thumbs up if they liked it, two thumbs up if they loved it, and to wiggle their fingers in the air if they couldn’t get enough of it. Wiggly fingers all around!

Feel free to use different flavor/veggie combinations.

Want a Greek pasta salad? Use Greek dressing and feta cheese instead of Italian dressing and Parmesan.

Want to add a spicy kick? Throw in some red pepper flakes!

Want to keep it vegan? Leave out the cheese and add some sunflower seeds for healthy fats and a yummy crunch.

Play around with it, using what you have or are craving. You won’t be disappointed.
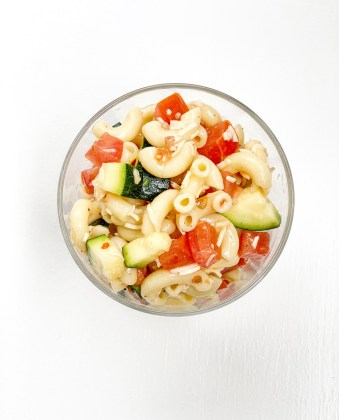
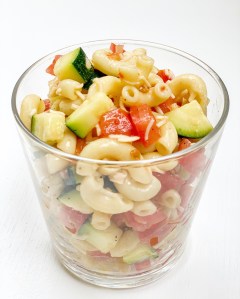
IMG_6660

Veggie Pasta Salad

  • Servings: 4-6
  • Difficulty: easy
  • Print

IMG_6658

Ingredients:

2 cups cooked + cooled pasta (see notes)
1 cup diced zucchini (raw)
1 cup diced tomatoes
2 TB Italian dressing
1/4 tsp salt
1/4 tsp black pepper
1/4 cup grated Parmesan cheese

Directions:

  1. Combine pasta, zucchini, and tomatoes in a medium-sized bowl, and mix to evenly distribute veggies throughout pasta.
  2. Drizzle on dressing, and sprinkle on salt, pepper, and cheese. Mix well to combine and evenly coat veggies + pasta.
  3. Cover and refrigerate for at least 30 minutes for flavors to blend, up to overnight.
  4. Serve and enjoy!

Notes:
-I recommend using macaroni or penne, and feel free to use gluten free pasta here! If you use gluten free pasta, after the pasta has been cooked, drained, and rinsed with cold water, toss with 1/2 tsp olive oil so that it does not stick together.
-This will last up to 5 days in the fridge. I do not recommend freezing.

Posted in Food, gluten free, Healthy, Recipes | Tagged , , , , , , , , , , , , , , , , , , , , , , , , | Leave a comment

Crispy Pan-fried Brussels Sprouts (AIP, Paleo, Whole30, Vegan)

You know how brussels sprouts at restaurants always seem to taste better than the ones we make at home? It’s because they’re able to get them perfectly crispy and crunchy…that texture of our dreams.

But how to achieve that at home without using a ton of oil or straight up frying them? I’ve been determined for some time and finally completely mastered it. It is SO easy and yields perfectly crispy brussels every time!

IMG_6499

There are a couple of keys here:

  • They must be shaved brussels (see photo for how I cut them).
  • Letting them sit undisturbed is what develops that crispy, caramelized brussel that you crave.
  • The big secret is turning off the heat, allowing them to cool slightly, then cranking the heat back up for one last crisp.

I know the recipe seems like a lot of “set your timer for 2 minutes!” but I promise it is WORTH IT. Trust!!

Feel free to multiply this recipe, just try to avoid crowding the pan because you don’t want the brussels to steam–then they’ll get soggy and not crispy!

IMG_6495-1

Crispy Pan-fried Brussels Sprouts

  • Servings: 1
  • Difficulty: easy
  • Print

IMG_6527

Ingredients:

1 cup shaved brussels sprouts
1 TB oil of choice
1 clove garlic, minced
1/4 tsp salt
1 TB coconut aminos

Directions:

  1. Heat a non-stick pan over medium-high heat. When the pan is hot, add oil and then brussels sprouts. Quickly stir to toss the brussels sprouts in oil then allow to sit in a single layer for 2 minutes, undisturbed.
    • How to tell if your pan is hot? Sprinkle a drop of water onto it and if it sizzles, your pan is ready. I’ll just run a little water onto my hand and flick it onto the pan to check.
  2. Toss/sauté the brussels, then spread them into a single layer and allow to sit for 2 more minutes, undisturbed. After the 2 minutes are up, repeat this process twice more.
    • To clarify, it goes: add brussels & toss → sit 2 minutes → toss → sit 2 minutes → toss → sit 2 minutes → toss → sit 2 minutes (so you’ll set the timer for “2 minutes” 4 times total here).
  3. Add garlic, salt, and coconut aminos, then sauté for 1 minute then turn off the heat.
  4. Let it sit in the pan until cooled, about 15 minutes.
  5. Quickly toss the brussels, then turn the heat back on to medium-high.
  6. When the brussels start to sizzle (listen for it!), let them sit for 2 minutes undisturbed.
  7. Toss/sauté, then allow them to sit for 2 more minutes.
  8. Serve immediately and enjoy the crispy deliciousness that is upon you.

Posted in AIP, Autoimmune Protocol, Food, gluten free, Healthy, Paleo, vegan, Whole30 | Tagged , , , , , , , , , , , , , , , , , , , , , , , , | Leave a comment

Cream of Mushroom Soup (AIP, Paleo, Whole30, Vegan)

IMG_5849

Cream of Mushroom Soup

  • Servings: 3-4
  • Difficulty: easy
  • Print

FullSizeRender-2

Ingredients:

1 large shallot or 1 small onion
16 oz baby portabella mushrooms, chopped
1 medium zucchini, chopped
1 tbsp cooking fat of choice
1 can coconut milk
3-4 cloves of garlic, minced
1 cup kale or spinach, chopped
2 bay leaves
1 TB fresh thyme (or 1 tsp dried thyme)
1 tsp black pepper (optional, omit for AIP)
1 tsp+ Magic Mushroom Powder*
Salt

Directions:

  1. Heat a pot on medium-high heat. Add 1 tbsp cooking fat, and when it has warmed or melted add in shallot/onion. Sauté until browned, about 5-7 minutes.
  2. Add mushrooms and zucchini with a pinch of salt (the salt will help them release their liquid and brown more quickly).
  3. When veggies have cooked down and are soft (another 5-7 minutes), add in minced garlic and stir well to incorporate. Sauté for 1 minute.
  4. Add coconut milk, then fill the coconut milk can with water and add that as well. Stir to combine things well.
  5. Add kale or spinach to the party and allow them to wilt (2 minutes for spinach, 3-5 minutes for kale).
  6. When greens have wilted, add bay leaves and Thyme, and stir to combine.
  7. Bring the soup to a simmer, then turn the heat down to medium-low and put a lid on top. Set a timer for 15 minutes.
  8. After 15 minutes, it’s time to blend ‘er up! Either carefully add soup ingredients to a high speed blender and blend well, or use an immersion blender to blend. Blend until velvety and smooth.
  9. Add 1 tsp Magic Mushroom Powder and give it a quick blend. Taste and add more seasoning if necessary.
    • Alternatively, you could add 1 tsp salt, but keep in mind that the umami flavor will not be as strong (you can always add something else in to achieve an umami flavor, like fish sauce).
  10. Spoon into bowls (or mugs) and slurp up!

Notes:
-You can buy Magic Mushroom Powder at Whole Foods (which is not AIP-compliant because the storebought version contains nightshades), or you can make your own via the recipe here. I made my own (a 1/3 batch made PLENTY) and omitted red pepper flakes to keep it nightshade-free. It’s the perfect pop of umami, and I love adding it to dishes in place of salt.
-This keeps in the refrigerator for up to 1 week and reheats well, either on the stovetop or in the microwave.

Posted in AIP, Autoimmune Protocol, Food, gluten free, Healthy, Paleo, Recipes, Whole30 | Tagged , , , , , , , , , , , , , , , , , , , , , , , , , , , , , , , , , , , , , , , , , , , | Leave a comment

Roasted Veggie Salad with Chickpea Croutons & Jalapeño Pesto Vinaigrette (Vegan)

I recently started a new job that is quite a commute from where I live. An hour, to be exact…without traffic. My first week, I was spending at least 2 1/2 hours per day on the road, which just didn’t feel feasible and was incredibly draining.

My second week, I was lucky enough to have dear friends who opened their homes to me and cut my commute down biiiiiig time. I actually had time to make dinner in the evenings and wake up at a decent hour in order to get to work on time!!

Of course, I had to thank my friends the only way I really know how: by cooking for them. Each night, I tried to make nutritious meals that tasted great and filled us up. It was a weird form of self-care to come home from a day of recipe testing to spend even more time in the kitchen, but I loved it.

I think it was different than cooking at work because I knew that whatever I made would be good, loved by both of us, and appreciated (not that my food isn’t appreciated at work, but it’s certainly different). It’s also such a joy to cook for two versus always cooking for one. Knowing that someone is going to be eating with me and enjoying the food I make is very motivating for me.

Each morning, I would do a quick scan of the fridge and pantry, then slowly dream up our dinner throughout the day with my mental inventory. This meal came together the same way. All I picked up from the store was the kale and broccoli, and everything else was pulled from what was already available.

This salad was GOOOOOOOOD. We both loved the flavors and textures at play.

And if you haven’t even massaged your  kale, START NOW. It changes everything. My friend said that she had never really cared for raw kale until that day, and her impression of kale completely changed when she saw how much the composition changed when it was massaged. I’ve changed the opinions of many people on kale simply by massaging it, which only takes an extra minute or two and is WORTH IT. It breaks down the tough green and makes it easier to chew (and digest), cuts the bitterness, and creates a bright green leaf that you will keep going back for because it’s that good. TRUST.

I have ingredient amounts included in the recipe but everything is pretty flexible and feel free to change things up as you wish! I included a few suggestions in the notes, but you can do whatever you’d like with the template I provided. Let me know if you make any changes–we could all use a little inspiration!

FullSizeRender

Roasted Veggie Salad with Chickpea Croutons & Jalapeño Pesto Vinaigrette

  • Servings: 2
  • Difficulty: easy
  • Print

FullSizeRender

Ingredients:

Chickpea Croutons:
1 can chickpeas/garbanzo beans
1/2 tsp salt
1/2 tsp garlic powder
1/4 tsp cayenne
1/4 tsp black pepper
(or 1/2 tsp salt and 1 tsp seasoning of choice)

Roasted Veggies:
Broccoli – 1 small stalk
Sweet Potatoes – 1 small or 1/2 large
Carrots – 1 large or 2 small
Cherry/Grape Tomatoes – 1 cup
Salt
Pepper
Olive oil

Jalapeño Pesto Vinaigrette:
1/2 jalapeño (de-seeded if you don’t want it spicy, leave the seeds in if you do)
1/4 cup parsley
1/4 tsp ground cumin
1 clove garlic
2 TB olive oil
2 TB water
1/2 tsp salt
1 tsp lemon juice

Greens:
1 large or 2 small bunches curly kale
1/2 tsp Olive oil
1/4 tsp Salt
1 tsp lemon juice

Directions:

  1. Preheat oven to 425°F. 
  2. Drain and rinse chickpeas, then dry well with a paper towel. Try to remove as much of the peels from the chickpeas as you can, but don’t sweat it if you can’t get all of them removed.
    • Tip: lay a paper towel on a flat surface, pour the chickpeas over, then lay another paper towel over them and rub the chickpeas between the two paper towels. This will dry them well and get off many of the outer shells.
  3. Toss chickpeas with remaining crouton ingredients, then spread onto a cookie sheet and put into the oven for 35-40 minutes, tossing once at the 15 minute mark and once more at the 30 minute mark.
    1. When you remove them from the oven, they will need to cool for a minute or so before they become deliciously crunchy. To test when I think they’re done, I will take one out of the oven and let it cool for a minute, then taste it. If it’s perfectly crunchy, I’ll pull the rest out. If not, I’ll leave them in for 5 more minutes then check again.
  4. After you put the chickpeas into the oven, chop your veggies. Chop them into bite-sized pieces, and cut the cherry/grape tomatoes in half. Spread them out onto a sheet pan. Drizzle with olive oil, sprinkle with salt and pepper, then toss and mix well. Add to the oven and bake for 15-20 minutes or until veggies are soft and lightly browned.
  5. After you put the veggies into the oven, make the vinaigrette. Throw all ingredients into a blender and blend well. Alternatively, you could use an immersion blender or just verrrrrry finely chop the ingredients and mash well. Either way, the dressing will be thick but that is okay. It will still mix well with the salad!
  6. De-stem the kale then tear into smaller pieces. Wash and dry the kale, then add to a large bowl and add the olive oil, salt, and lemon juice. Massage the kale very well (about 2 minutes) until the kale is bright green and soft, and it has absorbed the oil well. Taste a piece and adjust salt if necessary.
  7. To assemble, place a large bed of kale onto your plate. Top with roasted veggies, spoon dressing on top, then add a generous amount of chickpea croutons on top of everything.
  8. Inhale and live your best life while feeling amazing and nourished.

Notes:
-This may look overwhelming, but it actually comes together really easily. Get the chickpeas in the oven, chop the veggies and throw them into the oven, then make the dressing and massage the kale. Assemble and bam!
-Not feeling the veggies listed here? Use any veggies you like! We loved the roasted tomatoes because they felt like additional little pops of dressing in the salad, but you can use any veggies. It’s incredible versatile.
-No jalapeño? Use another pepper! Scrape the seeds out and throw a habanero pepper in there instead.
-If prepping ahead of time, I recommend massaging the kale and storing the components separately, then assembling whenever you plan to eat the salad. Keep dressing, greens, and roasted veggies refrigerated, and keep chickpea croutons in an airtight container out of the fridge.

Posted in Food, gluten free, Healthy, Recipes, vegan | Tagged , , , , , , , , , , , , , , , , , , , , , , , , , , , , , , , , , , , , | Leave a comment

Easy Baked Sweet Potato Fries (AIP, Paleo, Whole30)

IMG_6094

Easy Baked Sweet Potato Fries

  • Servings: 3-4
  • Difficulty: easy
  • Print

IMG_6094Ingredients:

1 large or 2 medium/small sweet potatoes, orange or white
Avocado Oil
Seasoning of choice

Directions:

  1. Preheat oven to 400°F. 
  2. Cut sweet potatoes into wedges by cutting in half width-wise (think hamburger vs. hot dog), holding each half cut-side down and cutting into approximately 4-5 thick slices, then cutting each slice into 4 wedges.
  3. Toss wedges with 2 TB avocado oil in a large bowl.
  4. Add desired seasonings and toss again to coat wedges evenly.
  5. Add wedges to a grid baking rack*, assembling in a single layer.
    • Be sure not to overcrowd the rack, leaving a little space in between each wedge. Otherwise they will steam and not roast. Roasting = crunch factor.
    • I put my baking rack over a baking sheet to catch any potential drips. I recommend you do this too.
  6. Place into oven and bake for 45 minutes to 1 hour, checking for doneness at 45 minutes. They’re done when they are lightly browned and crispy!
  7. Eat up, buttercup!

Notes:
-These keep well in the fridge for up to 1 week and can easily be reheated in the oven or crisped back up on a skillet.
-I used Primal Palate Adobo Seasoning and love it for this recipe, but you can use any seasonings you’d like. A simple sprinkle of salt and pepper would be divine!
-A grid baking rack* is essential to getting that perfect crisp without having to flip them because they cook evenly the whole time. If you don’t have one, then flip the wedges at the halfway point to ensure that they evenly brown on both sides.

Posted in AIP, Autoimmune Protocol, Food, gluten free, Healthy, Paleo, Recipes, Whole30 | Tagged , , , , , , , , , , , , , , , , , , , , , , , , , , , , , , , , , , , , | Leave a comment

Spaghetti Squash Patties (Paleo, Whole30)

Here’s the thing…I love the idea of spaghetti squash more than I enjoy the vegetable itself. I like it for the first few bites, then the texture largely becomes unappealing.

Yet I buy the vegetable again and again, hoping to reinvent it in a way that keeps it interesting for me.

This time, I decided to make some patties! They’re wonderful on their own or with some chimichurri drizzled on top (although let’s be honest, chimichurri just makes everything better).

Hope you make this super simple recipe and enjoy!

IMG_6052

Spaghetti Squash Patties

  • Servings: 4-5
  • Difficulty: easy
  • Print

fbbd7b1b-fc6b-478b-b58f-1d5f37d4d856.jpeg

Ingredients:

1 small spaghetti squash or 1.5-2 cups spaghetti squash strands
2 large eggs
1/2 cup coconut flour
1 TB Primal Palate Adobo seasoning
Olive Oil
Salt
Pepper

Directions:

  1. Preheat oven to 400°F.
  2. Slice spaghetti squash in half, scrape out the seeds, then rub 1-2 teaspoons olive oil into each half and sprinkle with salt & pepper.
  3. Place onto a lined cookie sheet and bake in oven for 40 minutes, or until the top feels soft/you can easily insert a fork through the skin.
  4. Once cool enough to handle, use a fork to scrape the strands out of the spaghetti squash halves, and measure 1.5-2 cups strands into a medium-sized bowl.
    • Alternatively, you could roast/steam/microwave your spaghetti squash according to your own preferences, then use 1.5-2 cups of the strands for the patties.
  5. In a small bowl, crack the eggs, being careful to not leave any shell behind, and whisk them gently to scramble.
  6. Add eggs to the spaghetti squash, along with coconut flour and Adobo seasoning.
  7. Form the dough into balls then press down with your hands to form patties. This recipe will make approximately 15-16 patties.
  8. Heat a skillet on low heat (low heat is important here because it will allow the patties to cook through and brown without burning).
  9. Add 1 TB olive oil, then add patties to the pan, cooking until browned on both sides (about 4-5 minutes per side). Carefully flip the patties to ensure they don’t fall apart. You’ll likely cook the patties in 3 batches of 5 at a time. Be sure to add 1 TB olive oil to the pan for each new batch.
  10. Serve! Try not to eat them all in one sitting.

Notes:
-These patties will keep in the refrigerator for up to 1 week.
-If you don’t have Primal Palate Adobo Seasoning, feel free to use your favorite spice blend, just adjust salt as necessary.

Posted in Food, gluten free, Healthy, Paleo, Recipes, Uncategorized, Whole30 | Tagged , , , , , , , , , , , , , , , , , , , , , , , , , , , , , , , , , , , , , , , , , , , | Leave a comment

Coconut Fizz Mocktail (AIP, Paleo, Whole30)

Listen. LISTEN. I know that it’s freezing outside and tropical cocktails aren’t exactly what everyone is craving.

But HEAR ME OUT.

…I don’t care.

Really though, sometimes when it’s cold outside I like to take myself to a warm, tropical destination by having some kind of fun beverage that makes me feel like I’m on the beach. Anyone else? Just me?

This drink does not have any alcohol in it as-is, but if you’re feelin’ frisky, I think it would be fantastic with some vodka or gin.

img_5821-2

Coconut Fizz Mocktail

  • Servings: 1 mocktail
  • Difficulty: easy
  • Print

img_5823-1

Ingredients:

3 TB coconut milk
Coconut LaCroix
Lime wedges
Ice

Directions:

  1. Fill a tall glass with ice.
  2. Add 3 TB coconut milk.
  3. Top off with the Coconut LaCroix.
  4. Squeeze a wedge or two of fresh lime juice into the drink.
  5. Stir well until everything is combined.
  6. Sip away!!

Notes:
-If you don’t have Coconut LaCroix on hand, feel free to use plain sparkling water. It won’t be as coconut-forward, but it’ll still be refreshing and delicious!
-Recipe is for one serving so you can double or triple as needed. The LaCroix does lose its carbonation, so I would not recommend making in advance.

Posted in AIP, Autoimmune Protocol, Paleo, Whole30 | Tagged , , , , , , , , , , , , , , , , , , , , , , , , , | 1 Comment

Sweet Potato Oat Breakfast Bars (Gluten-free, Vegan)

Oat bars are such an easy grab ‘n go breakfast option. I’m always looking for things that don’t take too much effort, especially recipes that don’t require expensive ingredients.

I actually dreamed up these bars while I was making celery juice one morning. I knew I had sweet potatoes I needed to use up, so I just threw them into my Instant pot per these instructions and went from there. Sometimes the best recipes come when you don’t have a real plan and are just throwing together whatever works. 🙂

There are so many ways to customize them too. Add some fruit (I love apples or pears), add nuts, add chocolate chips, maybe add in some collagen or other protein powder to get an extra protein boost. You can customize them however you want!

However you choose to customize, you must make these ASAP because you will definitely love them for their simplicity and flavor. The extra vitamin boost from the sweet potatoes doesn’t hurt either!

fullsizerender-1

Sweet Potato Oat Breakfast Bars

  • Servings: 8-10
  • Difficulty: easy
  • Print

img_5786

Ingredients:

3 cups gluten-free rolled oats
1 1/2 cups mashed sweet potato (see notes)
2 large eggs (or 2 flax eggs/chia eggs, to keep vegan)
1 cup milk of choice
1 TB cinnamon
1/4 tsp sea salt
2 tsp vanilla extract
1/4 cup pure maple syrup (see notes)
1/4 cup chia seeds (optional)
1/4 cup optional mix-ins: nuts, chocolate chips, chopped apples, etc

Directions:

  1. Preheat oven to 375°F.
  2. In a large bowl, mix mashed sweet potato with rolled oats. Use your hands to make sure they are combined well.
  3. In a separate bowl, combine the rest of the ingredients (except for the optional mix-ins) and mix well.
  4. Add the wet mixture to the sweet potato/oat mixture and stir to combine.
  5. Add in your optional mix-ins and combine.
  6. Grease a 12-inch cast iron skillet with coconut oil or ghee.
  7. Pour mixture into skillet, using your hands or a silicone spatula to spread evenly.
  8. Bake for 30 minutes or until firm and lightly browned. The edges should be coming in from the sides of the skillet.
  9. Allow to cool, then cut into bars.
  10. ENJOY!

Notes:
-For a quick mashed sweet potato, you can follow this recipe to cook them in the Instant Pot, then peel and mash. Otherwise you can make the sweet potatoes in advance or used canned!
-These bars are not too sweet. If you want a sweeter option, then feel free to increase the maple syrup to 1/2 cup instead.
-The bars will keep in the fridge for up to 1 week, or in the freezer for up to 3 months.

Posted in Food, gluten free, Healthy, Recipes | Tagged , , , , , , , , , , , , , , , , , , , , , | Leave a comment

Thai Meatballs from Keto Quick Start

I was beside myself when I found out that I was chosen to be on Diane Sanfilippo’s launch team for her new book, Keto Quick Start. While I wasn’t as familiar with the Keto diet, I’ve long been a follower of Diane’s. I admire her no-nonsense attitude with the things she’s passionate about, as well as her focus on producing quality content for thousands (and thousands) of people.

Well, people, this book is no different. It’s actually like getting two books in one: a textbook AND a cookbook.

Diane dives straight into the science behind the keto diet and breaks it down into a manageable, digestable (see what I did there?) format. Too often, reliable sources of information tend to be large, intimidating information dumps that feel impossible to unpack. Keto Quick Start, however, couldn’t be further from that. In fact, the book is full of colorful tables, charts, and displays that prevent the feeling you get when you’re inundated with new information and your eyes start to glaze over.

You can order here for the best Keto resource I’ve ever seen.

Honestly, when reading this book, it felt like it had been written by a friend. A friend who understood my need to have things explained in a detailed, yet concise manner. A friend who knew that I would have a million questions about keto and somehow managed to answer each one. A friend who truly had my best interest at heart when writing this book.

Oh, and a friend who created KILLER recipes, mostly with staples that I would already have on hand.

Like these Thai meatballs.

Not only are these ridiculously easy to make, but they are juicy, delicious, and packed with flavor. Insert toothpicks and serve as appetizers if you’re hosting a party, enjoy as a protein-packed snack, or serve with any veg or cauliflower rice for an easy meal (particularly the cilantro cauli-rice from Keto Quick Start)!

However you enjoy, I recommend serving with a squeeze of fresh lime juice. 😉

FullSizeRender-10

Thai Meatballs by Diane Sanfilippo

  • Servings: 6
  • Difficulty: easy
  • Print

FullSizeRender-10

Ingredients:

-2 TB coconut aminos
-1 TB red curry paste
-2-3 dashes of fish sauce
-Grated zest of 1 lime
-1/4 cup finely chopped fresh cilantro leaves
-1/4 cup minced green onions (about 1 green onion)
-1 tsp grated or minced garlic (about 2 cloves)
-1 tsp sea salt
-1/4 tsp ginger powder
-1 lb ground pork
-1 lb ground chicken or turkey, preferably dark meat for the best flavor
-Additional chopped fresh cilantro leaves, sliced green onions, and/or sesame seeds for optional garnish

Directions:

  1. Preheat the oven to 375°F.
  2. In a small mixing bowl, combine the coconut aminos, red curry paste, fish sauce, lime zest, cilantro, green onions, garlic, salt, and ginger powder. Stir to mix well.
  3. In a large mixing bowl, combine the chicken and pork and mix well with your hands.
  4. Add the marinade and use your hands to mix it with the meat until well combined.  Form the meat mixture into 24 meatballs (about 1 1/3 oz each) and place on a rimmed baking sheet.
  5. Bake for 20 minutes, or until cooked through.
  6. Remove the meatballs from the oven and garnish with cilantro, sesame seeds, and green onions, if desired. Serve with cauliflower rice.

Notes:
-If you use Big Tree brand coconut aminos, use less salt
-You can also use 2 lbs of one type of ground meat if you prefer. In that case, Diane recommends using ground pork for best flavor.

While I was offered a free copy of Keto Quick Start, I was not compensated for this post and all opinions expressed are my own.

Posted in Food, Healthy, Paleo, Recipes, Whole30 | Tagged , , , , , , , , , , , , , , , , , , , , , , , , , , , , , , , | 1 Comment

Scalloped Sweet Potatoes with Garlic, Sage, and Toasted Pecans (Paleo, Whole30)

Hi friends, and welcome back! I took a brief hiatus from the blog because I started a new job that has taken some adjustment. I’m back though and so excited to share some great recipes with you.

This new holiday favorite was born out of necessity. Our 12th annual Friend Thanksgiving was a more intimate gathering this year since fewer were able to attend, which also meant fewer dishes brought to the potluck. That morning, we realized that one staple dish that was not accounted for was the sweet potatoes. My dear friend, the hostess, wanted sweet potatoes at the table. So I volunteered to throw something together, and this dish began to formulate in my mind.

It may have been one of the best things I’ve ever made. Ever, ever. EVER.

THIS DISH, PEOPLE.

My friend Kacie saw the photo I shared of it on my stories on Instagram, and she immediately messaged me stating that she needed the recipe. A couple of days later, she expressed that the situation was dire because she had been assigned sweet potatoes as her Thanksgiving side dish contribution. I quickly texted her the recipe because I understood the URGENCY.

Kacie doubled the recipe and divided it into two casserole dishes, which worked out well. She also added a sprinkle of cayenne to her pecan topping to give it a little kick (which I think is brilliant).

This was her feedback from Thanksgiving day:

IMG_5174

I know that sweeter sweet potato dishes are common during the holidays, with brown sugar, cinnamon, and marshmallows. But truth be told, those are not my favorite. I prefer to go the savory route with my sweet potatoes, which is what these are.

It’s the perfect balance of flavors and textures, and tastes better than it has any right to, especially considering how easy it is to make.

OKAY FINE without further ado, here’s the recipe that will steal all the thunder at your holiday table.

61DD158E-9186-4A58-8F95-23A3F7D02DB5

Scalloped Sweet Potatoes with Garlic, Sage, and Toasted Pecans

  • Servings: 6-8
  • Difficulty: easy
  • Print

FB28470F-9BEC-494C-91F0-69A8122E754B

Ingredients:

-3 medium sweet potatoes (see note)
-1/4 cup fresh sage, finely chopped
-4-6 cloves garlic, minced
-1/2 stick + 2 TB butter (sub 3 TB + 1 TB olive oil, ghee, or coconut oil for Paleo/Whole30)
-1/2 cup broth (chicken, veggie, bone, anything works)
-1 cup raw pecans
-1 tsp dried thyme
-Sea salt
-Black pepper
-Olive oil

Directions:

  1. Preheat oven to 375°F. 
  2. Thinly slice the sweet potatoes (about 1/8 inch thick, they don’t all have to be exact or uniform) and toss in 1 TB olive oil, 1/2 tsp salt, and 1/4 tsp black pepper. Layer them into a baking dish or pie dish, creating a single layer of overlapping sweet potato slices.
  3. Pour 1/2 cup broth over the sweet potatoes.
  4. Melt 1/2 stick butter over medium heat, then add minced garlic and chopped sage. Mix well. You don’t want to brown it, just mix it together and gently warm for about 30 seconds, then remove from heat.
    • If using olive oil, warm 3 TB olive oil for 1 minute on stovetop, then add garlic and sage. Sauté for 30 seconds then remove from heat.
      267E3DA0-747F-40A4-9823-08D585E64D17
  5. Pour the mixture evenly over the sweet potatoes, using a spatula to spread the garlic and sage if necessary.
  6. Give the sweet potatoes a little drizzle of olive oil (maybe 1 tsp), then cover with foil and bake for 45 minutes or until sweet potatoes have softened.
  7. In the meantime, finely chop the raw pecans. Melt the 2 TB butter (or 1 TB olive oil) on a skillet, then add pecans, 1/4 tsp sea salt, 1/4 tsp black pepper, and 1 tsp dried thyme (this seems like a lot but TRUST). Sauté, stirring continuously, until the pecans begin to deepen in color and grow fragrant (about 5 minutes). Remove from heat and spread across parchment paper to cool and dry. They’ll become gloriously crunchy as they cool. TRY NOT TO EAT IT ALL.
  8. When the sweet potatoes have softened (check with fork for doneness), carefully remove the foil and top the sweet potatoes with the toasted pecan mixture.
  9. Place back into the oven for 10-15 minutes, allowing the pecans to toast more without burning them (check them frequently).
  10. Remove and serve, and revel in the fact that you just won Thanksgiving.

Notes:
-Choose longer and thinner sweet potatoes that are even in thickness. This will ensure that they cook evenly.
-The pecan topping is what makes the dish, so I like a lot of it. If you don’t want quite as much, you could easily decrease to 3/4 cup or even 1/2 cup pecans. Be sure to adjust the other measurements accordingly.
-You can easily make this earlier in the day, cool, then stick back into the oven to warm through before serving. That’s what I did and it worked beautifully!
-Alternatively, you could make everything the day before sans the pecans, then reheat the dish in the oven, add pecans, and cook through. Whatever makes your day easiest!

Posted in Food, Healthy, Holiday, Paleo, Recipes, Uncategorized, Whole30 | Tagged , , , , , , , , , , , , , , , , , , , , , , , , , , , , , , , , , , , , , , , , , , , , , , , , , , , | Leave a comment